Sunday, July 20, 2008

Ardha Halasana


Ardha Halasana - The Half-Plough Pose


Yoga Exercises > Yoga Asanas or Poses > Ardha Halasana - The Half-Plough Pose

"Ardha" means 'half' and 'Hala' means 'plough' in.


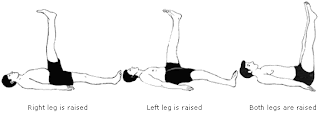
Ardha Halasana


Sequence:


  1. Lie flat on your back.

  2. Stretch your legs at full length.

  3. Keep the heels and the big toes together.

  4. Stretch your arms on the respective sides with palms turned down.


  5. Inhaling, press the palms down and raise first one leg slowly as high as possible without bending the knee, keeping the other leg flat on the floor.

  6. Hold the leg straight up until you complete the inhalation.

  7. Exhaling, bring the leg down slowly.

  8. Repeat the process with the other leg also.

  9. Take three turns, alternating the legs.

  10. Inhaling, press the palms down and, without bending the knees or raising the hands, raise the legs together slowly till they make an angle of 30 degrees to the ground, then 60 degrees, and, finally, bring them perpendicular at 90 degrees to the ground.

  11. Complete the inhalation.


  12. Fix your gaze on the big toes.

  13. Remain in this position as long as you can hold your breath comfortably.

  14. Exhaling, press the palms down again, and without bending the knees, bring down your legs together slowly, pausing for five seconds each as they reach 60 degrees and 30 degrees to the ground.

  15. Execute three turns, raising both legs together.


Caution:


Practice this asana on an empty stomach.

  • Keep your back as close to the floor as possible.

  • The legs should not shake while performing the asana.

  • Women should not practice this asana during menstruation and after the third month of pregnancy.


Benefits:


  • Ardha Halasana builds up the elasticity of the muscle in the abdominal area.

  • It prevents the prolapse of the abdominal organs, such as the uterus in women and the rectum in men.


  • It has a curative effect on menstrual disorders.

  • It helps to rid the stomach and intestines of gas and eliminate constipation.

  • It prevents hernia.

  • Persons who have varicose veins can practice this posture several times a day to get relief.

  • You may perform this asana in bed also before rising in the morning if you are plagued by constipation.

Friday, July 18, 2008

yogasana

Statue of Shiva performing Yogic meditation


Akarshana Dhanurasana - The Pulled Bow Pose
Yoga Exercises > Yoga Asanas or Poses > Akarshana Dhanurasana - The Pulled Bow Pose


"This posture is known as "Akarshana Dhanurasana" because while practicing it, the heels and hips are raised.


Sequence:
1. Sit erect.
2. Stretch out the legs and keep them close together.
3. Place the palms on the floor at the sides.
4. Bend the right leg at the knee and crossing the left leg, place the right heel on the ground beside the left ankle.
5. Grasp the right big toe with the thumb, index and middle fingers of the left hand and the left big toe with the right thumb, index and middle fingers.
6. Inhaling and keeping the head erect, pull up the right foot till the right knee comes near the right armpit and the right big toe touches the left ear. While doing this, the right hand should pull the big toe of the left leg. While pulling the toes, fix your gaze on the big toe of the stretched left leg.
7. Exhaling, bring back the right foot to the floor on the left side of the outstretched left leg. Release the hands and stretch the legs straight again side by side.
8. Practice reversing the position of the legs. Variation: Stretch out the legs. Pull the big toes straight towards the ears on the same side of the body, one after the other.

Benefits:
The arms, shoulders, chest, waist, back, thighs and calves come into play in Akarshana Dhanurasana, and they become well developed, well proportioned and strong.


Anantasana - Yoga Pose
Yoga Exercises > Yoga Asanas or Poses > Anantasana
This is a pose named after the sleeping position of Lord Vishnu.


Sequence:
1. Lie down on the back with legs together, straight extended, the toes erect and hands straight and palms resting on the floor to acquire the supine pose.
2. Turn on left side, and place the elbow of the left hand on ground with left palm supporting your head as shown in figure.
3. Keep right hand near your chest on ground, continue normal breathing.
4. Bend right leg at the knee and place the toe on left thigh.
5. Keep right knee steady pointing towards roof, hold index finger of the right leg by right hand.
6. Continue normal breathing.
7. Repeat this for right side with left leg on right thigh.
8. While releasing the pose, slowly bring hands to the normal position and take supine position.

Benefits:
Practicing of the pose improves balancing capabilities.
It also stretches the hamstrings and calves, improving blood circulation and also cures any muscle pull.